Texture Connect
Authorize consumer device connections through secure OAuth flows
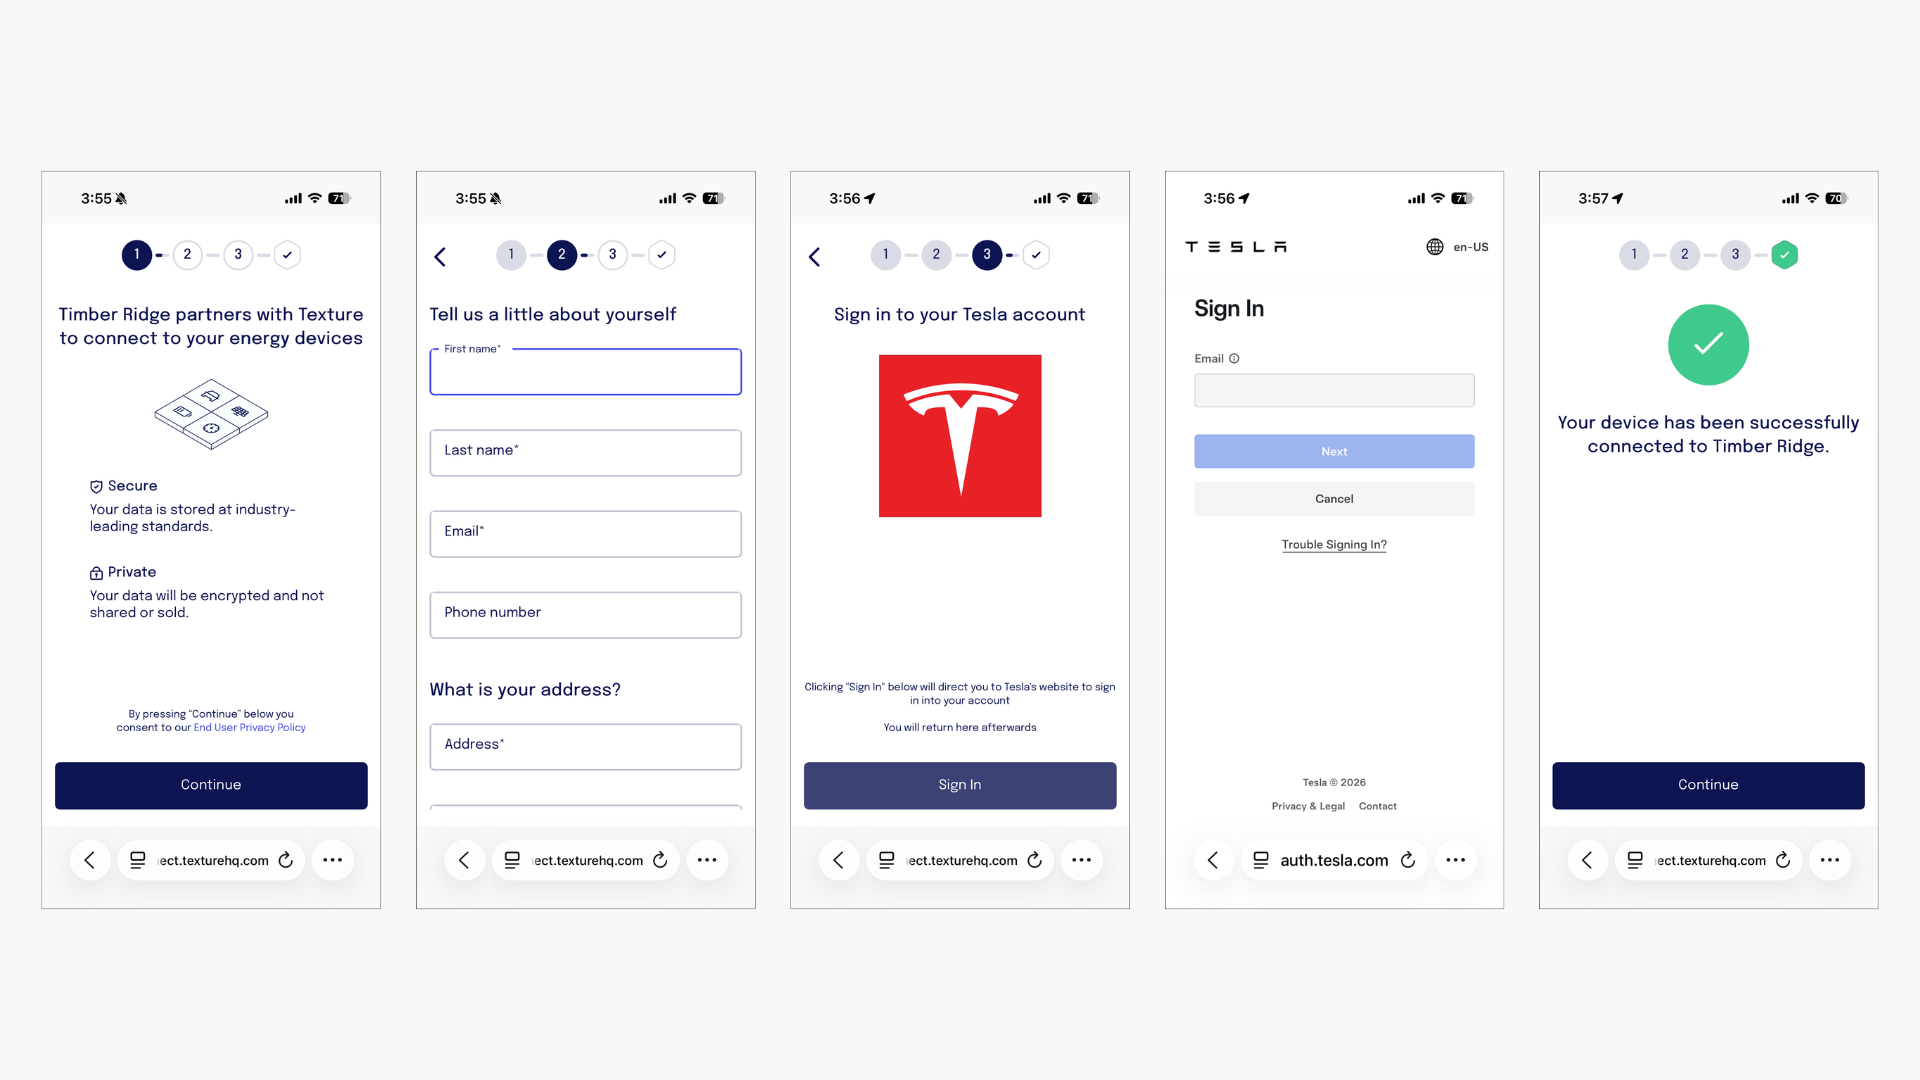
Texture Connect enables your customers to securely authorize access to their energy devices through OAuth flows. This is the primary method for connecting individual consumer devices like home batteries, EVs, and smart thermostats to your application.
How It Works#
When a customer connects their device through Texture Connect, they:
- Authorize Access - Grant permission to access their device data through the manufacturer's OAuth flow
- Complete Setup - Provide contact information and device preferences
- Receive Access - Your application gets a scoped key to access their device data
Why Texture Connect is Different#
Texture Connect provides customer-verified data accuracy through our unique authorization flow, built on official OEM partnerships rather than reverse engineering or web scraping:
Customer-Confirmed Information#
During the Connect flow, customers actively confirm their:
- Contact Information - Name, email, phone number
- Site Details - Physical address and location data
- Device Preferences - Which devices to connect and access permissions
This customer verification ensures that the Sites and Contacts created in your Texture workspace contain accurate, up-to-date information that customers have explicitly confirmed.
Automatic Data Resolution#
Once customers complete the flow, Texture automatically:
- Creates or updates Contact records with verified customer information
- Creates or updates Site records with confirmed location data
- Links connected devices to the appropriate Site and Contact
- Provides you with clean, structured data ready for your energy management applications
This approach ensures reliable, high-quality data that you can trust for your energy management applications.
Integration Methods#
Choose the integration method that best fits your application:
1. Texture Connect SDK#
Easiest way to get started with pre-built components:
- JavaScript/TypeScript - For web applications
- React - For React applications
- React Native - For mobile apps
2. Texture API#
For custom implementations with full control over the flow. See our open source examples.
3. Headless Connect#
For partners who want a fully white-labeled experience with complete control over the UI and flow. See the Headless Connect section below.
4. Dashboard Direct Links#
For testing or manual connections, use the Texture Dashboard and navigate to the Connect section.
Configuration Fields#
When creating a Texture Connect session, you'll need to provide these configuration fields to track and manage the connected devices:
| Field | Required | Description |
|---|---|---|
redirectUrl | Yes | The URL where users are redirected after completing the Connect flow. This can be a web URL (e.g. https://mycompany.com/app) or a mobile deep link (e.g. myapp://device/connected). The scoped key will be appended as a texture_scoped_key query parameter, which you should store securely in your app or backend. See Scoped Keys for more details. |
referenceId | No | Any unique identifier to reference this customer in your system. Often a userId, an identifier for this device or this site. Anything that you can use to identify and find the connected device(s) later on your end. If an identifier of your own is not supplied we will generate one on your behalf of the form texture-generated:<uuidv7>. |
tags | No | An optional array of tags which can be used for grouping your devices. Could be some kind of identifier for a group on your end (like a groupId) or it could be any other way you group devices (e.g. by location boston or connecticut or flatiron) whatever you think you may want to aggregate device data by or run batch controls on devices. These will be alterable later by API so you can add and remove tags later. |
clientName | No | This is what will appear in our Connect flow as your company name which your end user will see. In the above screenshot the company name is "Energy Coffee" and this value would go there. If you do not specify a value here it will default to your Organization name, hence why it is optional. But your use case may be connecting devices on behalf of a client and so we include this as an option for maximum flexibility. |
customerId | No | An existing identifier for a customer of yours in the Texture platform. If supplied, it takes priority over any information supplied in the optional customerInfo object and over referenceId. When you create a connect link a customerId will be returned identifying the customer the connect link is for. This returned identifier can be used or provided in this field later to create another connect link for the customer. If the customer has multiple sites, the first associated site is used unless you also provide an explicit siteId. |
siteId | No | The ID of an existing site to associate with the connect session. In standard mode, when provided it takes highest priority over any site resolved from customerId or customerInfo.location. In headless mode, siteId must be paired with customerId — see Headless Connect for the supported request combinations. |
mode | No | standard (default) or headless. Headless mode bypasses the Texture-hosted Connect UI and returns an OAuth authorization URL directly. See Headless Connect for details. |
Advanced Configuration Objects#
manufacturerFilters#
An optional object allowing different filters to restrict or narrow down the manufacturers available in the connect flow.
| Property | Description | Example |
|---|---|---|
manufacturers | Restricts the manufacturers available to those specified in this list. If only 1 manufacturer is specified, the manufacturers selection/search page in the connect flow will be skipped. | ["enphase", "tesla"] |
deviceTypes | Restricts the manufacturers available to those that have devices available of the specified types. | ["battery"] |
customerInfo#
An optional object to allow passing in information related to the customer for which the connect link session is for. Information supplied here will pre-populate info in the customer collection form of the connect flow. If you supply a valid first name, last name, email, and location we will bypass this form for the customer.
| Property | Description | Example |
|---|---|---|
firstName | The first name of the customer going through the connect flow. | "John" |
lastName | The last name of the customer going through the connect flow. | "Doe" |
email | Email associated with the customer going through the connect flow. | "example@example.com" |
phone | Phone number associated with the customer going through the connect flow. | "555-555-0100" |
location | A nested object that houses information related to the customer site or location. If this is supplied, then all fields must be supplied, partial information is not accepted. More details on structure can be found in the API Reference. | {"streetOne": "1600 Pennsylvania Avenue NW", "city": "Washington","state": "DC", "postalCode": "20500", "country": "US"} |
Quick Start: Texture Connect SDK#
The Texture Connect SDK is the easiest way to get started with consumer device connections. It provides pre-built components that handle the OAuth flow for you.
Installation#
Javascript/Typescript#
Simply install it from NPM
$ npm install @texturehq/connect-sdk
or if you prefer Yarn:
$ yarn add @texturehq/connect-sdk
Including via CDN also works (recommend pinning a specific version in this case instead of latest). A Texture property will be added to the global window object.
<script src="https://unpkg.com/@texturehq/connect-sdk@latest/dist/connect-sdk.iife.js"></script>and then use it!
React#
Simply install it from NPM
$ npm install @texturehq/react-connect-sdk
or if you prefer Yarn:
$ yarn add @texturehq/react-connect-sdk
and then use it!
React Native#
Simply install it from NPM
$ npm install @texturehq/react-native-connect-sdk
or if you prefer Yarn:
$ yarn add @texturehq/react-native-connect-sdk
and then use it!
Usage#
Javascript/Typescript {#usage-javascript}#
import { createConnectSession } from "@texturehq/connect-sdk-web";

const texture = createConnectSession({
  connectApiKey: "<connect-api-key>",
  connectOptions: {
    referenceId: "<reference-id-from-your-system>",
    clientName: "Name for your application",
    redirectUrl: "https://your-application.com/redirect",
    tags: ["tag1", "tag2"],
    manufacturerFilters: { manufacturers: ['honeywell', 'daikin'] },
    customerInfo: {
      email: "example@example.com",
      phone: "555-555-0100",
      firstName: "John",
      lastName: "Doe",
    },
  },
  onSuccess: ({ scopedKey }) => {
    // The scopedKey returned is a string that can be used to make requests to Texture API
    // to retrieve data related to the newly connected account
  },
  onError: ({ type, reason }) => {
    // The error object contains a type and reason
    // type is identifier for the type of error that occurred
    // reason is a string that provides more information about the error
    // type 'popup-blocked' means that the popup window was blocked from opening
    // type 'popup-closed' means that the popup window was closed before the connection was established
  },
});

// Open the popup window
texture.open();

// You can also pass in options when opening the popup window
texture.open({
  width: 500,
  height: 600,
});

// Close the popup window
texture.close();

// Get the current link/connect url
console.log(texture.url);

// Get the current scoped key (only available after a successful flow is completed)
console.log(texture.scopedKey);
React {#usage-react}#
The Texture Connect SDK exposes a useCreateConnectSession hook which will handle much of the process for creating a link session.
It returns a method called "open" which you can call from your React code whenever you would like to open a pop-up which will guide the user through connecting their device to your application via the Texture platform.
import { useCreateConnectSession } from "@texturehq/react-connect-sdk";

function App() {
  const { open } = useCreateConnectSession({
    connectApiKey: "<connect-api-key>",
    connectOptions: {
      referenceId: "<reference-id-from-your-system>",
      clientName: "Name for your application",
      redirectUrl: "https://your-application.com/redirect",
      tags: ["tag1", "tag2"],
      manufacturerFilters: { manufacturers: ['honeywell', 'daikin'] },
      customerInfo: {
        email: "example@example.com",
        phone: "555-555-0100",
        firstName: "John",
        lastName: "Doe",
      },
    },
    onSuccess: (session) => {
      console.log(session);
    },
    onError: (error) => {
      console.log(error);
    },
  });

  return (
    <>
      <div className="card">
        <button onClick={() => open()}>Open Texture</button>
      </div>
    </>
  );
}

export default App;
React Native {#usage-react-native}#
The Texture Connect SDK exposes a TextureConnect component which will handle much of the process for creating a link session.
Wrap TextureConnect around a component, and your component will become a button that opens the Connect flow from your React Native code. It displays as a popover which will guide users through connecting their devices to your application via the Texture Platform.
It's worth noting you should supply the redirectUrl to the TextureConnect props via connectOptions, this should be the custom URL scheme of your mobile app. e.g: facebook://
import { TextureConnect } from '@texturehq/react-native-connect-sdk';

// ...

  return (
    <GestureHandlerRootView style={{ flex: 1, justifyContent: 'center', alignItems: 'center' }}>
      <TextureConnect
          connectApiKey="<YOUR_CONNECT_API_KEY>"
          connectOptions={{
            clientName: 'Name for your application',
            referenceId: '123',
            redirectUrl: 'example://',
            manufacturerFilters: { manufacturers: ['honeywell', 'daikin'] },
            customerInfo: {
              email: "example@example.com",
              phone: "555-555-0100",
              firstName: "John",
              lastName: "Doe",
            },
          }}
          onError={(type, reason) => console.log(type, reason)}
          onSuccess={(scopedKey) => console.log("Texture Scoped Key", scopedKey)}
        >
            <Text>Tap here to connect a device.</Text>
        </TextureConnect>
    </GestureHandlerRootView>
  );
}Examples#
Check out some examples in our open source repository.
Advanced: Texture API#
For custom implementations with full control over the flow, use the Texture API directly. Visit our API Reference to learn more about creating connections.
Headless Connect#
Headless Connect is an enterprise feature and must be enabled for your organization before use. Contact your Texture account team to request access.
Headless Connect gives your application complete control over the user interface and connection flow. Instead of redirecting users to the Texture-hosted Connect UI, your application collects all necessary information, creates the connect link, and then redirects the user directly to the manufacturer's OAuth authorization page — all within your own branded experience.
This integration style requires more implementation work on your end, but gives you full ownership of every screen the user sees.
Why Choose Headless Connect#
- Fully white-labeled — no Texture-hosted pages are shown to your customers
- Complete UI control — design and build every step of the flow yourself
- Texture-mediated OAuth callback — the manufacturer redirects to Texture's server after OAuth completes; Texture then propagates the result to your
redirectUrl
The trade-offs: you are responsible for collecting customer and site information upfront, handling OAuth callbacks, and gracefully managing all error states.
Prerequisites {#site-resolution}#
Before initiating a headless connect session, your application must have:
-
A manufacturer that supports OAuth — not all manufacturers use OAuth; credential-based manufacturers cannot be used with headless mode
-
Exactly one manufacturer in
manufacturerFilters.manufacturers -
A
redirectUrlyour application controls — this is where Texture will redirect the user after OAuth completes (the manufacturer redirects to Texture's server, which then forwards to yourredirectUrl) -
One of the following three request combinations for customer and site identification:
Scenario Required fields How site is resolved Existing customer with site customerIdCustomer's first associated site. If the customer has multiple sites, use customerId+siteIdinstead to control which site is used.Existing customer, explicit site customerId+siteIdExplicit siteIdNew customer Full customerInfo(firstName, lastName, email, location)New site created from customerInfo.locationAny other combination — such as
siteIdwithoutcustomerId, or partialcustomerInfo— will be rejected with a validation error.
Creating a Headless Connect Link#
Set mode: "headless" in your POST /v1/connections request:
curl -X POST https://api.texturehq.com/v1/connections \
  -H "Content-Type: application/json" \
  -H "Texture-Api-Key: your_api_key" \
  -d '{
    "mode": "headless",
    "manufacturerFilters": { "manufacturers": ["tesla"] },
    "customerId": "cllh2buhk000008la0ln6cb80",
    "siteId": "cllh2buhk000008la0ln6cb81",
    "redirectUrl": "https://yourapp.com/oauth/callback"
  }'
Alternatively, you can provide full customer and site information to create records on the fly:
curl -X POST https://api.texturehq.com/v1/connections \
  -H "Content-Type: application/json" \
  -H "Texture-Api-Key: your_api_key" \
  -d '{
    "mode": "headless",
    "manufacturerFilters": { "manufacturers": ["tesla"] },
    "customerInfo": {
      "firstName": "Jane",
      "lastName": "Smith",
      "email": "jane@example.com",
      "location": {
        "streetOne": "123 Main St",
        "city": "Austin",
        "state": "TX",
        "postalCode": "78701",
        "country": "US"
      }
    },
    "redirectUrl": "https://yourapp.com/oauth/callback"
  }'
Headless Connect Response#
A successful headless response includes the resolved siteId and an authorization object with the OAuth URL:
{
  "customerId": "cllh2buhk000008la0ln6cb80",
  "linkUrl": "https://connect.texturehq.com/link_...",
  "linkToken": "link_e47b6d39dd3e6b3ab55969f55dc88ae6",
  "linkSessionId": "cllh2buhk000008la0ln6cb82",
  "expiresAt": "2026-04-20T12:30:00Z",
  "siteId": "cllh2buhk000008la0ln6cb81",
  "authorization": {
    "type": "oauth_redirect",
    "url": "https://auth.tesla.com/oauth2/v3/authorize?client_id=..."
  }
}
Redirect the user to authorization.url to begin the manufacturer OAuth flow.
Handling the OAuth Callback#
After the user completes (or declines) OAuth authorization, the manufacturer redirects to Texture's server, which then redirects the user to your redirectUrl. The following query parameters will be appended:
On success:
| Parameter | Description |
|---|---|
texture_scoped_key | The scoped API key for this connection. Store this securely — it grants access to the customer's device data. See Scoped Keys for more details. |
texture_customer_id | The Texture customer ID. |
texture_existing_devices | Present with value true if the customer already had connected devices before this session. Omitted otherwise. |
On failure:
All failure callbacks include a texture_error query parameter. Texture normalizes OAuth errors from manufacturers into a stable, documented set — RFC 6749 standard codes pass through as-is, manufacturer-specific codes are mapped to their Texture equivalents, and any unrecognized error falls back to unknown_error.
| Value | Description |
|---|---|
connect_session_expired | (Texture) The connect session timed out before OAuth completed. |
connect_session_already_completed | (Texture) OAuth was already completed for this session (replay protection). |
oauth_state_mismatch | (Texture) CSRF state validation failed. |
connection_failed | (Texture) Authorization completed but Texture's token exchange or device connection creation failed afterward. This may be transient — retry may succeed. |
device_incompatible | (Texture) The user's device does not support the requested permissions, is not eligible for connection, or the account has no compatible devices. |
subscription_required | (Texture) The device account lacks an active connected-services subscription with the manufacturer. |
unknown_error | (Texture) An unrecognized error occurred. A companion texture_error_raw parameter will contain the original error string from the manufacturer, intended for debugging and logging only. |
access_denied | (RFC 6749) The user declined authorization. Some manufacturers use non-standard codes for this which Texture normalizes to access_denied. |
server_error | (RFC 6749) The manufacturer's authorization server encountered an unexpected error while processing the authorization request. The user may not have completed the OAuth flow. Retry may succeed. |
temporarily_unavailable | (RFC 6749) The manufacturer's authorization server is temporarily unable to handle the request due to overloading or maintenance. Unlike server_error, this indicates a known transient condition — retry after a delay. |
Example callback handler:
const params = new URLSearchParams(window.location.search);
const error = params.get("texture_error");

if (error) {
  // Handle error state
  const errorRaw = params.get("texture_error_raw"); // present only when error === "unknown_error"
  console.error("OAuth failed:", error, errorRaw);
} else {
  const scopedKey = params.get("texture_scoped_key");
  const customerId = params.get("texture_customer_id");
  // Store scopedKey securely and use it for subsequent API calls
}
Alternative: Direct Credentials#
📘 Already have customer credentials?
If you already have customer credentials or direct access to manufacturer APIs, we can work with you to ingest those credentials directly. This bypasses the OAuth flow entirely.
Contact us to discuss direct credential integration options.